What is a Harness? A Study based on Claude Code
Introduction
Recently, OpenAI and Anthropic have both mentioned the word harness multiple times in their blog posts. What is a harness? Why do we need a harness? How should we design a harness? To answer these questions, this article starts from the basic concept of harness and uses Claude Code as an example to give a full introduction to how harness works in a real product. Then, based on my recently open-sourced project SearchClaw, I will further discuss how harness design can be applied to deep search and deep research agents. Finally, I will share some of my personal thoughts and understanding of the concept of harness. I hope you find it helpful.
1. What is a Harness
According to the Cambridge Dictionary, the English word harness refers to a piece of equipment with straps and belts used to control or hold a person, animal, or object in place. If you ask a model to translate it directly, it might tell you it means horse gear, safety belt, or scaffolding. All these translations are trying to express the same idea: a supporting device for something. In our context, that something is the large language model (LLM).
In my previous article, I introduced the basic concept of agents. An agent is a software system driven by a large language model that can plan, execute, use tools, and has some memory capability. If we remove the large language model from the agent, we get a simple equation: Agent = LLM + Harness [1]. In other words, all the tools, memory, and everything else in the agent that is not the model itself belongs to the harness. (Yes, OpenClaw is also a form of harness engineering in practice.) Since this is not really a brand new concept, some readers might naturally ask: why do we need a new word for it?
Based on what OpenAI and Anthropic have said, as well as my own understanding, the concept of harness is broader than just tools and memory mentioned before. It refers to a complete set of safety net mechanisms that are necessary for an agent to complete tasks, especially long-running tasks. Some readers who are not very familiar with agents might wonder: why does an agent need extra mechanisms to ensure task completion?
Let me use OpenClaw as an example. If we ask OpenClaw to help research a topic, during this process it might need to talk to the user to clarify the research direction, search the internet to collect materials, use a summarization tool to extract content from retrieved documents, and use a context compression mechanism to make sure the whole process does not exceed the model's window length. From the moment the user gives the instruction to the final response, all the tools and mechanisms (such as context compression) that the model needs belong to the harness. If these supporting harness components are not ready, the task will fail for one reason or another. Therefore, I define harness as a complete set of safety net mechanisms that help an agent complete its tasks.
![Figure 1: Visual description of harness from LangChain Blog [1]](/blog/images/image_2_1.png)
According to the LangChain Blog [1], a harness includes all of the following:
- System prompts
- Tools, skills, etc.
- Infrastructure (file system, sandbox, browser, etc.)
- Orchestration logic (sub-agent systems, model routing, etc.)
- Hooks and various middleware (context compression, code checking, etc.)
From Figure 1, we can see that a harness is like a layer of gear, safety belt, or scaffolding wrapped around the model. It ensures the model can work for a long time and complete tasks accurately. Next, let us look at how Anthropic built their harness around the Claude model series to ensure that Claude Code, a coding agent, can produce high-quality code. This is made possible by the Claude Code source code that Anthropic accidentally released.
2. How Claude Code Builds Its Harness
I am not sure how many readers are programmers or how familiar you are with Claude Code. Claude Code is a coding assistant tool developed by Anthropic based on the Claude model. With Claude Code, users can participate in the code writing process through natural language input. For example, a user can type: please analyze all the code in this project and write a Readme file for me. Claude Code will then read the entire project and write a Readme file as requested. Another example: the user can type: please add XXX feature to the current project. Claude Code will analyze the current project state, propose a plan, confirm with the user, and then write the code. Using Claude Code skillfully can significantly speed up a programmer's development process.
Of course, Claude Code is not perfect. Frequent users may notice that the code it writes also has problems, and sometimes these problems are things that would never happen when a human writes code. Many programmers around me share the same feeling: after using Claude Code, a large portion of their time shifted from writing code to reviewing code. In fact, reading, understanding, and spotting errors in code generated by Claude Code is not easy, because this code was not written by you from scratch. For this reason, I strongly encourage everyone to use AI tools more in their work. Only by using these tools often can you learn what they are good at and what they are suitable for. Leave the tasks that need humans to humans, and hand over everything that machines can do to machines. Your work efficiency will naturally improve a lot.
Below, I will look at how a real product-level harness is built, based on seven aspects of Claude Code's design. Please note that I did not read the source code very carefully. Some information comes from the internet [2] and from Claude's own explanation after reading its source code (yes, it can understand its own source code). Since the focus of this article is to help readers understand how a harness works, I have also simplified some of Claude Code's original design for easier explanation. I strongly recommend that everyone take time to read the source code. It contains many very detailed designs that are very helpful for better understanding agents.
2.1 Main Loop
As a coding agent, Claude Code is still an agent at its core. So the main loop follows the same ReAct pattern introduced in the previous article: User Input, Context Assembly, Model Decision, Tool Execution, Result Injection, Continue or Stop.
What makes Claude Code unique is that it splits the main loop into two levels: the query engine and the query itself. The query engine manages the user's session and assembles the right context before handing it to the query module for loop processing. You can think of it as adding an extra layer on top of the traditional ReAct loop that specifically manages multi-turn conversation information. Each round of user input is processed by the query module's loop, and the results are returned to the query engine for management.
The query loop is also designed as an asynchronous generator. The benefit of this design is that results do not need to wait until all content is generated. Instead, parts that are ready to return are yielded as they are produced, so the caller gets real-time output. In addition, Claude Code also designed tool calls as streaming output. This means that as soon as a complete tool call appears during generation, it is immediately parsed and dispatched for execution. By the time the full generated content appears, the tool call results may already be available. This greatly improves the user experience.
The execution loop also includes many mechanisms to ensure smooth operation. For example, before processing a user query, Claude Code first estimates whether the current context might exceed the threshold. If the context is too long, it enters the compression mechanism to control the overall context length (described in detail in the next section). Only after that does Claude Code begin to build the actual context to send to the model.
In the previous article, I mentioned that in a traditional ReAct loop, the condition for continuing the loop is that the model's output contains a tool call, meaning the model has not yet finished the task. In Claude Code, besides tool calls, there are other conditions for continuing the loop. For example, if the context is too long and the model API returns an error, a pre-designed compression mechanism is triggered to further compress the context, and then the request is sent to the model again.
From the description above, you can already feel that even for the simplest ReAct loop, Claude Code has designed many harness components to ensure successful task execution. Among them, the design of triggering compression and resending when the context is too long is exactly what I call a safety net mechanism. This mechanism makes the user think that the model completed everything smoothly. But in reality, the failure was caught by the harness, and the model was called again to finally achieve the successful result. This kind of careful design that ensures the success rate on the user side is exactly what makes a harness so valuable.
2.2 Context Management
Context management is a very important part of Claude Code, because the model's performance depends entirely on the content of the context. As we all know, every large language model has a fixed processing window. For example, Claude's latest model supports 1 million tokens of input. (Note: this does not mean the model can handle everything perfectly within 1 million tokens. As mentioned in previous articles, the model's processing ability decreases as the window grows longer.) One million tokens sounds like a lot (imagine how thick a novel of several hundred thousand words would be), but in a coding agent, dozens of file reads and hundreds of tool calls can quickly generate raw text that exceeds 1 million. Therefore, deciding what to keep in the context, what to compress, and what to discard is a problem the harness must solve.
Besides performance concerns, context management also involves efficiency. Recall that when using an agent (such as OpenClaw), every input sent to the model actually includes a large amount of system prompts, tool definitions, and other content. If the model has to process all this from scratch every time, it would bring huge overhead in both time and computation. How do we deal with this? Users who have used LLM API services may notice that providers usually list separate prices for input that hits cache and input that does not hit cache, with the latter being much more expensive. Hitting cache means that for completely identical prefixes in the prompt, the model does not need to compute them again (because the result is exactly the same) and can directly reuse the previous computation results. Therefore, context management for LLMs must also consider how to maximize the use of prefix caching. This caching is very strict. Even a tiny change in the prefix makes the cache unusable (because the computation result would be different). Claude Code's context management carefully balances performance and efficiency.
On the caching side, Claude Code caches a portion of the system prompts, including identity information, system rules, task execution guidelines, operation guidelines, tool usage rules, tone and style, and output efficiency guidelines. This content is the same for every request from the same user, so it is cached globally. The system prompts also contain another portion of dynamic content that is not cached, including memory, user language preferences, custom output styles, and so on. These vary by project and by user.
Besides caching, the most important task of context management is deciding what content should stay in the context. For this, Claude Code designed a five-level compression mechanism that compresses the context layer by layer as needed:
- The first level compresses tool results. This level actually has two granularities of control: individual tool result level and single message level. At the individual tool result level, if a tool returns a result that exceeds its threshold (default: 50,000 characters), the result is stored as a file on local disk, and only the first 2,000 bytes of preview content plus the storage path are kept in the context. At the single message level, even if no individual tool result exceeds its threshold, when the total of multiple parallel tool results in the same round exceeds the message budget (default: 200,000 characters), the system starts persisting the largest results to disk one by one until the total falls within budget. This compression does not depend on any model call at all. It operates directly on strings. While achieving compression, since the original content is fully saved on disk, the model can later recover the complete content through file reading tools, balancing compression efficiency and information recoverability.
- The second level trims historical messages. When the context grows to a certain point, the system trims older message segments from the conversation history that have low relevance to the current task. Like tool result compression, trimming also does not depend on model calls. It directly deletes messages.
- The third level is micro-compression. Micro-compression specifically cleans up historical results from certain types of tools (such as file reading, shell commands, search, web scraping, etc.), replacing older tool return content with a short marker: [Old tool result content cleared].
- The fourth level is context folding. Context folding is a compression method that is more aggressive than micro-compression but more precise than full summarization. It replaces a series of consecutive conversation turns (including previous model responses, tool calls, and tool results) with a single summary message generated by the model.
- The last level is full compression. This is the final active defense line. When all the previous levels still cannot bring the context within the threshold, full compression launches a complete model call to compress the entire conversation history into a summary. It works by creating a sub-agent that reads the complete conversation history and generates a structured summary, then replaces all historical messages with the summary message. After compression, the system also re-injects key context attachments, such as important file contents the model previously read, active sub-agent states, and the research plan, to make sure the model does not lose critical working context after summarization. In addition, full compression has a circuit breaker: if it fails more than 3 times in a row, it stops retrying to avoid wasting API calls when the context cannot be recovered.
As you can see, Claude Code's context management reaches a very high level of detail. The core design principle of the entire compression system is progressive degradation: first use low-cost operations that do not depend on the model (string truncation, content cleaning), and only call the model for summary compression when there is no other choice. Each level tries to keep as much fine-grained context as possible and only lets the more aggressive next level take over when the previous level cannot meet the requirement.
You might have noticed a problem in the five-level compression pipeline above. Multiple levels (such as full compression) depend on a core judgment: how many tokens does the current context actually use? Some readers might ask: is it really that hard to count tokens? Yes, it really is, because token counting is done locally, and most LLM providers do not share their tokenizer and vocabulary with users. Therefore, how many tokens are in the current context can only be estimated. Only the server side knows the real number. Claude Code's estimation is based on the generation result returned by the model in the previous round. The API call from the previous round includes exact token counts. So Claude Code needs to estimate how much new content was added in the current round based on the previous round. This estimation is quite simple: it uses the rule that four characters roughly equal one token. As you can see, this estimation is just an approximation. The ratio between character count and token count obviously depends on the language, content type, special symbols, and other factors. Whether the context has actually exceeded the limit is only known after sending the message to the model and seeing the response. That is also why, in the previous section on the main loop, we mentioned that a context-too-long error triggers the model to re-enter the ReAct loop.
2.3 Tool System
Tool Definition and Registration
The tool system in Claude Code is the core interface for interacting with the external environment. As I introduced in the OpenClaw article, the model itself cannot directly operate on the file system, execute commands, or access the network. All these capabilities are achieved through tool calls. The tool system must satisfy multiple constraints at the same time: the tool set must be dynamically extensible (users can add custom tools through the MCP protocol), tool definitions must be friendly to prompt caching, and tool execution must support security controls (users can set allow, deny, or ask policies for each tool).
Each tool is essentially an object that follows the tool interface. It contains a name, input parameter format, description text, permission checking logic, and an actual execution function. The system provides a function to simplify the definition process. It provides safe default values for common methods (for example, by default tools do not support concurrency, and by default tools produce side effects). Developers only need to override the parts that differ from the default behavior.
Tool registration uses a centralized manifest pattern. A core function lists all possible built-in tools in the system. Many tools are conditionally loaded based on environment variables and other factors. The final effective tool list goes through another function for filtering, and is then merged with user-provided external tools to form the complete tool pool.
Default Tool Set
The built-in tools in Claude Code can be roughly divided into the following categories:
- File operations: Read, Edit (precise editing based on diffs), Write (whole file writing), NotebookEdit (Jupyter notebook operations), Glob (file name pattern matching), Grep (content search)
- Command execution: Bash (shell command execution, the most powerful tool and the one that needs the most security control)
- Network access: WebSearch, WebFetch (fetch and parse web content)
- Task management: Agent (start a sub-agent to handle complex subtasks), TodoWrite (task list management)
- Interaction and planning: AskUserQuestion, EnterPlanMode/ExitPlanMode (enter and exit planning mode)
- Extension mechanisms: Skill (call pre-defined skill scripts), ListMcpResources/ReadMcpResource (access MCP server resources), ToolSearch (dynamically discover lazily loaded tools)
Besides built-in tools, external tools connected through the MCP protocol are dynamically injected into the tool pool at runtime. They share the same calling mechanism and permission controls as built-in tools.
Tool Call Flow
When the model includes a tool call request in its generated response, the system runs a series of steps before actually executing it:
- Tool lookup: Find the corresponding tool definition in the current tool pool by tool name. If not found, the system also checks whether it is an old alias of a renamed tool (for backward compatibility).
- Input validation: Verify that the parameters generated by the model match the expected types and structure. The model does not always strictly follow the rules when generating tool parameters (for example, writing an array as a string). This step catches such errors and sends formatted error messages back to the model.
- Tool-specific validation: Call the tool's own validation method for logic-level checks (such as whether the file path is valid, whether the command is within the allowed range).
- Permission check: Determine whether execution is allowed based on the tool type, user-configured permission rules, and the safety classifier in automatic mode. For operations that require user confirmation, an interactive confirmation dialog is displayed.
- Execution and result handling: Call the tool to perform the actual operation. The execution result is formatted and injected into the conversation history for the model to reference in the next round of reasoning.
- Post-execution handling: Run post-execution related functions, which can be used for logging, result modification, and so on.
Parallel Execution
The model can make multiple tool calls in a single response. The system checks each tool's parallel-safe property to decide which calls can run in parallel. The scheduling logic splits multiple tool calls in the same round into several batches: consecutive concurrency-safe tools (such as multiple file reads, multiple searches) are grouped into the same batch and run in parallel; tools that are not concurrency-safe (such as file writes, command execution) are placed in separate batches and run sequentially.
In addition, the system provides a streaming tool executor. It allows execution of fully parsed tool calls to begin while the model response is still streaming. There is no need to wait for the entire response to complete. This pipeline-style parallelism further reduces end-to-end latency.
Tool Search and Lazy Loading
When users connect a large number of tools, putting the full content of all tools into the system prompt would take up a lot of context window space. To address this, the system introduces a Tool Search mechanism. When the model needs to use a lazily loaded tool, it first calls the Tool Search tool to discover the target tool through keyword search or direct name selection. The system then injects the complete tool definition into subsequent API requests.
Tool Result Rendering and Folding
At the user interface level, the display of tool calls and results is also carefully designed. Each tool defines its own rendering method. It can control what is shown during execution, how results are displayed, and how to provide progress feedback during execution.
For consecutive search and read operations (such as multiple Grep, Glob, and Read calls), the system folds them into a single summary message. This prevents a large number of repetitive tool call messages from overwhelming the user's view. The folding decision is based on the tool's own property. Search tools (Grep, Glob, grep/find commands in Bash, etc.) and read tools (Read, cat/head commands in Bash, etc.) are all included in the folding scope. Multiple parallel calls of the same type of tool (such as reading multiple files at the same time) are also pre-grouped to further simplify the display. Users can switch to verbose mode to see the full unfolded content.
From all the above, you can see that even though tool systems are already very common in the agent field, there are still many parts that need careful detailed design. It is precisely these extreme attention to details that ensure both the success rate of tool execution and a good user experience on the interaction side.
2.4 Hook Design
Hooks are an event-driven extension mechanism provided by Claude Code. They allow custom logic to be injected at key points during the agent's execution. The design concept is similar to Git Hooks: when a specific event happens, pre-configured external programs are automatically triggered. But hooks in Claude Code cover a wider range of events and have a richer interaction protocol. Many features in Claude Code itself are implemented through the hook mechanism.
Tool lifecycle events are the most frequently used type. Through hooks triggered before tool execution, you can check tool inputs and make decisions to allow, reject, or modify the input. Through hooks triggered after tool execution, you can perform auditing, result checking, or inject additional context.
The most important hook in Claude Code is the Stop hook. It is triggered when the model's response does not contain any tool calls (meaning the model thinks the task is done). The Stop hook can check the quality of the final answer and return a blocking error, forcing the model to keep working. This is the key mechanism for quality control. This is also why users always feel that Claude Code has a very high success rate. Responses that do not meet quality control requirements are intercepted by the hook mechanism, and the model is forced to rethink and improve the response.
Beyond this, Claude Code's memory mechanism is also built on hooks. During the Stop hook phase, the system starts memory extraction (extracting information worth saving from the conversation) and the auto-dream process. These tasks do not block user interaction.
2.5 Multi-Agent System
Claude Code's multi-agent architecture is not a single pattern. Instead, it provides three levels of collaboration paradigms based on task complexity and collaboration needs: sub-agent spawning, coordinator mode, and agent teams. These three differ in autonomy, communication methods, and context management, forming a complete spectrum from lightweight to heavyweight.
Sub-Agent Spawning
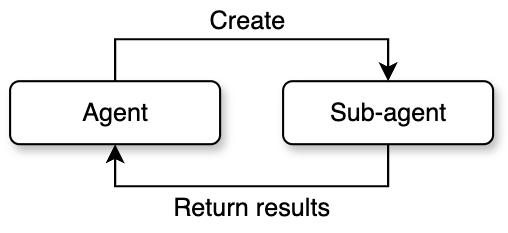
The first form, sub-agent spawning, is the simplest. It follows a one-way lifecycle of spawn, execute, and collect. The parent agent creates a child agent through the agent tool. The child agent completes the task independently and returns the result to the parent agent. The whole process does not involve two-way communication.
The system pre-defines multiple sub-agent types, each optimized for specific scenarios. For example, the general-purpose agent has a full tool set and is suitable for complex tasks like research and implementation. The exploration agent focuses on fast code searching and only keeps read-type tools. The planning agent is used for designing implementation plans and disables all write operations. Each type is configured differently through tool whitelists, system prompts, and maximum round limits.
The sub-agent creation process has five stages: first, resolve the specific agent definition based on the type name; then assemble the tool pool allowed for that type; next, build the system prompt containing role instructions; then create an isolated execution context; finally, start the actual reasoning loop. Context isolation is a key safety design here. By default, the child agent cannot access any state of the parent agent. Specific resources must be shared through explicit configuration.
A special variant is Fork mode. Unlike regular sub-agents that start from a blank context, Fork sub-agents fully inherit the parent agent's conversation history and system prompts. The core motivation for this design is prompt cache sharing: all Fork sub-agents spawned from the same moment have byte-level identical API request prefixes, which hits the cache on the LLM side and significantly reduces inference costs. To achieve this, when building the Fork conversation, the system replaces all tool call results from the parent agent with a unified placeholder text. It only appends the different task instructions at the end. This ensures that everything except the last text block is exactly identical. Fork sub-agents also have a built-in recursion protection mechanism. They check for a specific marker in the conversation history to prevent a Fork sub-agent from spawning new Forks.
The permission handling for sub-agents is also worth noting. The system provides multiple permission modes: a sub-agent can bubble up permission requests to the parent terminal for the user to decide, or it can automatically reject all operations requiring permissions in a restricted environment. This allows sub-agents to both execute sensitive operations that need user authorization and run safely in fully automated pipelines.

Coordinator Mode
Coordinator mode changes the parent agent's role from executor to director. In this mode, the parent agent (the coordinator) does not perform any specific coding or file operations. Instead, it focuses on understanding the user's intent, breaking down tasks, assigning work, and synthesizing results.
The coordinator has a streamlined tool set: it only keeps management tools like spawning workers, sending messages, and stopping tasks. All actual code reading and writing, command execution, and other operations are delegated to worker agents. Worker agents have the full standard tool set and MCP tool access, and can independently complete research, implementation, and verification tasks.
This mode defines a clear four-phase workflow: the research phase has multiple workers investigate the codebase and problem background in parallel; the synthesis phase has the coordinator read the research results, understand the nature of the problem, and create a specific implementation plan; the implementation phase has workers execute changes according to the coordinator's detailed instructions; the verification phase has independent workers test and verify the results. The coordinator takes on the most critical responsibility in the synthesis phase. It must truly understand the workers' research findings, not simply forward them. The system prompt explicitly prohibits instructions like: based on your findings, fix this issue. It requires the coordinator to include specific file paths, line numbers, and modification content in its instructions.
Communication between the coordinator and workers uses an asynchronous pattern. Worker results are delivered as task notifications asynchronously. While waiting, the coordinator can continue responding to the user or start new workers. This mechanism makes parallel processing a core advantage of coordinator mode. Independent research tasks can run at the same time, covering the problem space from multiple angles. The coordinator also needs to manage concurrency conflicts: read-only research tasks can run freely in parallel, but implementation tasks involving file writes need to avoid operating on the same set of files.
The coordinator also supports lifecycle management of workers, including stopping workers promptly when they go in the wrong direction, continuing a completed worker's context by appending messages, and deciding whether to reuse a worker or create a new one based on context overlap.
Agent Teams
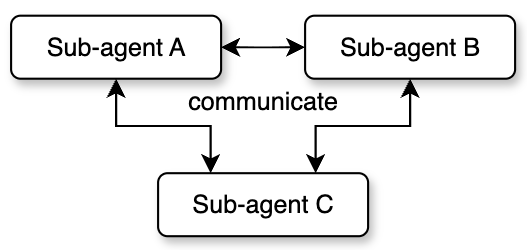
Agent teams are the most complex multi-agent mode, achieving true peer-to-peer collaboration. Unlike the first two modes where child agents are managed one-way by the parent, each member in a team has an independent session and inbox. They can send messages to each other, forming a decentralized collaboration network.
Team creation starts from a leader. The leader initializes the team through a dedicated team creation tool, generates a team configuration file, and registers itself as the first member. Then the leader can spawn new teammates to join the team. Each teammate has a unique identity (a combination of name and team name), an assigned color (for UI distinction), and an independent working directory.
Team members communicate asynchronously through a mailbox system. Each member has an independent inbox. Other members use the send message tool to write messages to the target member's inbox. The inbox is built on the file system and supports both point-to-point messages and team-wide broadcasts. Besides regular text messages, the mailbox also carries structured protocol messages, such as shutdown requests and responses, plan approvals and rejections, and so on. This achieves complete lifecycle coordination.
Team mode also introduces the concept of a shared scratch area. This is a directory that all members can freely read from and write to without permission confirmation. It is used for cross-member knowledge persistence. Members can write research findings, intermediate results, or coordination information into the scratch area, and other members can read it at any time. This makes up for the limitations of asynchronous messages when transferring large amounts of structured data, and provides shared persistent storage for team collaboration.
That covers the multi-agent system in Claude Code. The three modes form a progressive complexity ladder: sub-agents are suitable for simple task decomposition and parallel execution; coordinator mode is suitable for complex tasks that need unified planning and phased progress; agent teams are suitable for large projects that need frequent interaction and long-term collaboration between members. The choice among these modes is made entirely by the model based on guidance in the system prompt.
2.6 Memory System
Claude Code's memory system solves a core challenge for agents: without memory, every session starts from zero, and user preferences, project background, and historical corrections are all lost. The core idea of this system is to only memorize information that cannot be derived from the current project state. That means code patterns, architecture, file structure, and Git history are self-describing information. Reading them directly is always more accurate than recalling them from memory. This principle fundamentally prevents drift between memory and reality.
Users who have used Claude Code are probably familiar with CLAUDE.md. This file is a static configuration file maintained manually by the user. It usually contains project specifications and coding standards. This is different from the memory system. Memory is a dynamic knowledge base that is automatically written by the system or triggered by commands. It stores personal preferences, behavioral corrections, and project dynamics. CLAUDE.md is fully loaded in every session, while the memory system uses index pre-loading and on-demand semantic recall. This ensures information accessibility while controlling context usage.
Memory in Claude Code can be divided into four types:
- User memory: Records the user's identity, role, preferences, and knowledge background. This helps the agent provide personalized service in future interactions. For example: the user is a data scientist who focuses on observability.
- Feedback memory: Records the user's corrections and affirmations of the agent's behavior. This type of memory is recorded in a structured way, including the rule itself, why, and how to apply. The system records both positive and negative feedback. If only corrections are saved, the agent will avoid past mistakes but might drift away from good methods the user has already verified. Recording the why enables the agent to make judgment calls in edge cases, rather than mechanically following rules.
- Project memory: Records project progress, decisions, and deadlines. It requires converting relative dates from user messages to absolute dates (for example, converting Thursday to 2026-04-09), because memory might not be read until weeks later.
- Reference memory: Records location pointers to external systems, such as: pipeline defect tracking is in the INGEST project in Linear.
The system also maintains an explicit exclusion list: code patterns, architecture, file paths, Git history, debugging steps, content already in CLAUDE.md, and temporary task details are never written to memory, even if the user explicitly asks to save them.
Memories are stored as individual Markdown files in the project directory. Each memory file contains metadata (name, description, and type). The description field is critical because it is the main basis for evaluating relevance during later semantic recall, so it must be specific.
The directory structure also has a MEMORY.md index file that serves as the entry point for the memory system. It functions as both an index of all memory files and a quick reference loaded into the context at the start of every session. Since it is loaded every session, it must stay compact. Each index entry should be one line with a link and a short description.
Claude Code's memory recall is implemented through a side-query model (usually a Sonnet model). By providing the front matter of all memory files to the Sonnet model, it selects the most relevant memories for the current query (up to 5).
Memory freshness management is a key mechanism for preventing outdated information from misleading the model. The system converts modification times to human-readable time distances (such as today, yesterday, 47 days ago, etc.), because models are not good at date arithmetic. A description like 47 days ago directly triggers the model's reasoning that this might be outdated. For memories older than 1 day, the system injects a warning: claims about code behavior or file references may be outdated.
Besides user explicit saves and the main agent actively writing memories, the system also runs a background extraction agent. After the main agent finishes its response (with no further tool calls), the extraction agent automatically pulls out information worth memorizing from the conversation.
2.7 Plan Mode
Plan mode is the only mechanism in Claude Code where the model actively reduces its own permissions. The core design philosophy is: for complex tasks, the model should explore first, plan next, and only execute after the user approves. Without this mechanism, a request like refactor the entire authentication system might cause the model to immediately modify over ten files, delete multiple functions, and introduce unnecessary dependencies, forcing the user to roll back all changes and start over.
There are two paths to enter plan mode. The user can actively trigger it through a command, or the model can autonomously call the entry tool after evaluating task complexity. The model's criteria for autonomous entry include: new feature implementation, multiple viable approaches, architectural decisions needed, changes affecting multiple files, and unclear requirements.
When entering plan mode, the system performs a symmetric state transition: it records the permission mode before entry (called the pre-mode), then switches the current mode to plan mode. All write operations are blocked, and the model can only use read-type tools to explore the codebase. This design ensures that the original mode can be precisely restored upon exit, making plan mode a side-effect-free, nestable insertion layer.
The default workflow for plan mode has five stages: the initial understanding stage dispatches exploration agents to investigate the codebase; the design stage dispatches planning agents to brainstorm solutions; the review stage has the main agent synthesize results and ask clarifying questions to the user; the writing stage puts the final plan into a plan file; the exit stage calls the exit tool to request user approval.
The system also provides an alternative iterative workflow: instead of completing all exploration before writing the plan, it forms a continuous loop between exploring, updating the plan file, and asking the user. This encourages fast interaction rather than exhaustive upfront exploration.
When exiting plan mode, the system first verifies that the model is actually in plan mode. This check is necessary because the model sometimes forgets that it has already exited. For example, context compression might remove the exit signal. The user can directly approve the plan, approve after editing, or reject (staying in plan mode). Plans that have been edited are marked as user-edited, reminding the model to pay attention to the changes.
3. Application of Harness to Deep Search Agent
After studying Claude Code's design, I had a very interesting idea. My own research area is search, and I wanted to know what would happen if I built a deep search (or deep research) agent from a harness engineering perspective, borrowing some ideas from Claude Code. So I built a harness for a deep search agent from scratch, called SearchClaw [3].
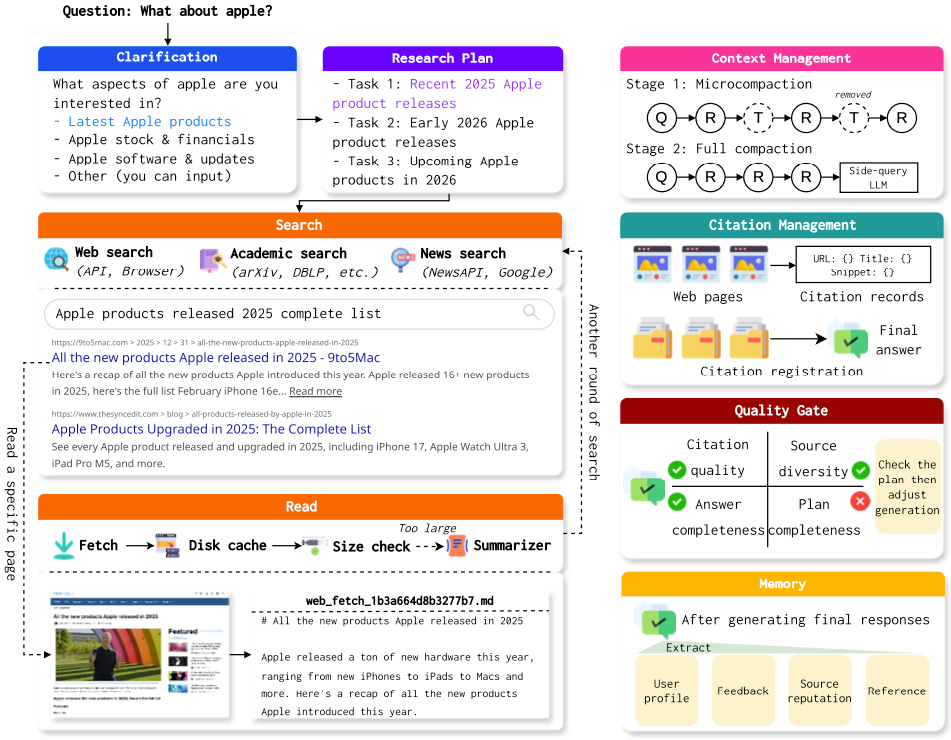
As shown in Figure 5, I also built the deep search system from the angles of research plan creation, context management, hook-based quality control, and memory. Below I will briefly introduce some of my ideas and designs during the implementation of this system.
First is the research plan. I have always had this idea, and Claude Code also has a similar to-do list feature, which gave me some inspiration. I believe that in deep search or deep research tasks, a good plan is very important. Creating a plan helps the model have a global understanding of the entire task before starting. Also, as the task progresses, the research plan should make some summary notes for each step, so the agent can track the current execution progress. For long-running tasks like deep search, a plan board can help the model avoid getting stuck in local searches. When designing this module, I also considered the potential ambiguity of the question itself. So before creating the plan, I designed a query clarification module for the system. When the model (also using a side-query model) determines that the user's input is too vague, it automatically shows several options based on possible research directions for the user to choose from. It also allows users to enter their own clarification. Through this design, the system can better understand the user's true intent and provide richer and more diverse information.
Search and reading are two very important modules for a deep research agent. On the search side, I designed a multi-level fallback mechanism for the system. The system first uses a search API (such as Serp). If the API cannot be accessed for any reason (such as exceeding the quota), browser-based search takes over as a fallback (relying on Playwright or CDP). If the browser also cannot access the search, the system uses DuckDuckGo search engine for direct requests. This three-level fallback mechanism can basically ensure that the search tool returns results. Besides the fallback, I also configured academic search, news search, and WeChat article search and other tools for the system, so it can get more diverse information. On the reading side, I also built a complete compression mechanism similar to Claude Code's design. First, the content of visited websites is cached to disk. Then, depending on the actual content size, the system decides whether to send the full text to the model or use a side-query model to compress the content. If the content is compressed, it also provides the model with the path to the original file. This set of mechanisms can effectively reduce the model's context pressure and prevent the context from being filled up by external search results.
Besides length control on reading tool results, I also designed a complete context compression mechanism. It mainly consists of micro-compression and full compression. Micro-compression mainly compresses tool call results. If that cannot meet the compression requirements, the side-query model is used for a full compression of the context. This mechanism ensures that during multiple rounds of tool calls, the context always stays within a reasonable range.
For quality control, I also adopted a hook mechanism similar to Claude Code. When the model returns a result with no tool calls, this result goes through multiple checks: does the generated result include multiple references? Are the reference sources diverse? Is the generated result long enough? Has everything in the previously created research plan been completed? If any check fails, the generated result is sent back to the model, asking it to improve according to the requirements before replying again. In actual use, this mechanism works very well in ensuring the quality of generated results.
For the memory module, I also fully considered the characteristics of deep search tasks. I focus on recording which website sources are more authoritative in memory, so that these websites' content can be prioritized during later reading. Websites that have been visited before are also recorded in memory, so that efficiency can be improved when researching similar questions later.
With this complete set of mechanisms in place, SearchClaw can indeed achieve very good search quality.
Although this system can already run smoothly, I still have some concerns. First, I do not know which of these designs are truly useful. Running benchmarks is actually biased for evaluating this type of system. Some user-facing designs I built into the system (such as asking the user questions) obviously cannot play a role in benchmarks, but I believe they can still effectively improve user experience. Second, it is hard to quantitatively analyze the function of each module. The interactions between modules are also hard to study. For example, what kind of coordinated mechanism should be used between the compression in the reading part and the compression in the context management mechanism is very difficult to figure out through experiments and tuning.
But regardless, with the help of some mature designs from Claude Code, the overall smoothness and success rate of the system are very encouraging. I think this is the true significance of harness engineering.
4. Some Thoughts on Harness
After the introduction above, I believe everyone now has a good understanding of the concept of harness. Through the SearchClaw project, I also gained a deeper understanding of harness design. Below I will briefly share my thoughts in a Q&A format.
Q1: What is the significance of harness?
A1: Based on current observations, task success rate is highly related to both the model and the harness. For the same task, the stronger the model, the lighter the harness can be. The weaker the model, the more it depends on harness design. I wonder if you have used the Claude model on its official website. The experience on Claude's official website already incorporates many agent design concepts. For example, when you ask it to complete certain tasks, it automatically makes tool calls. That means it probably also has a complete harness to ensure task success rate. This is also why the Claude user experience is much better than other providers. In reality, Claude may not always generate a good enough answer, but because of the harness safety net mechanisms, some errors are caught and the final answer gets corrected. Therefore, I believe that in the future, besides improving the base model's capabilities, we also need to build the most suitable harness for each practical application. I believe Claude Code will see huge changes once the Claude model itself is updated. Problems that previously needed harness safety nets might no longer need them after the model's capabilities improve, just like scaffolding being gradually removed as construction progresses.
Q2: What might be the future development of harness?
A2: Based on some recent work (such as Meta-Harness [4]), an important future direction is how to let agents automatically optimize their own harness. From the development blogs of Claude Code and Codex, we can see that both products' developers used Claude and GPT extensively during development. In other words, the current harness designs were also generated by models. However, these designs still heavily depend on human experience. Some recent work also discusses automatic skill/tool generation, which I believe is essentially a form of auto-harness. Also, from my experience with OpenClaw, I have noticed that the current harness is too tightly bound to a specific base model. Many designs were created under the conditions of a single model (such as Claude), which inevitably leads to insufficient adaptation to other models. A harness optimized for Claude is very likely not suitable for GPT models. Therefore, whether there could be harness methods that can automatically adapt to different models on some common foundation is a very interesting future direction. In short, before base models truly have extremely strong capabilities, harness will be a system engineering requirement that models must rely on for a long time. It is extremely important, but it might eventually disappear.
Q3: Do we need to specifically study harness now?
A3: From my personal experience, the current harness is too engineering-heavy. Many designs that seem reasonable may not have been verified through careful experiments. Some cannot even be experimentally verified, because there are just too many combinations of different designs. I recommend that students interested in harness take the time to read the Claude Code source code carefully. You will definitely benefit a lot. On the other hand, from the source code design of Claude Code, you can also see that current research on context management, memory management, tool calling, and other aspects broadly speaking also belongs to harness research. In other words, harness is not an entirely new field, but rather a systematic summary of existing agent engineering practices.
References
[1] https://blog.langchain.com/the-anatomy-of-an-agent-harness/
[2] https://github.com/Windy3f3f3f3f/how-claude-code-works
[3] https://github.com/RUC-NLPIR/SearchClaw
[4] Meta-Harness: End-to-End Optimization of Model Harnesses, Lee et al., 2026.